MEASUREMENTS AND ERRORS
Contents
MEASUREMENTS
There are several requirements that must be met if a measurement is to be useful in a scientific experiment:
1. The Number of Determinations
It is a fundamental law of laboratory work that a single measurement is of little value because of the liability not only to gross mistakes but also to smaller random errors. Accordingly, it is customary to repeat all measurements as many times as possible. The laws of statistics lead to the conclusion that the value having the highest possibility of being correct is the arithmetic mean or average, obtained by dividing the sum of the individual readings by the total number of observations. Because of time limitations, we often suggest you do a minimal number of repetitive measurements but remember this reduces the reliability and respectability of your results.
2. Zero Reading
Every measurement is really a difference between two readings, although for convenience, most instruments are calibrated so that one of these readings will be zero. In many instruments, this zero is not exact for all time but may shift slightly due to wear or usage. Thus it is essential that the zero be checked before every measurement where it is one of the two readings. In some cases the zero can be reset manually, while in others it is necessary to record the exact zero reading and correct all subsequent readings accordingly.
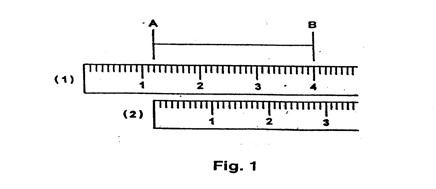
e.g. When measuring the length AB, Fig. 1, a ruler could be placed (1) with 1.2 cm at A, then length AB = (4.0 - 1.2) cm = 2.8 cm. The more usual ruler position (2) allows the length AB to be read as 2.8 cm directly, but remember this is still the difference between two readings: 2.8 cm and 0.0 cm.
3. Accuracy
Quantitative work requires that each measurement be made as accurately as possible. The main units of a scale are usually divided, and the eye can easily subdivide a small a distance of 1 mm into five parts reasonably accurately.Thus, if a linear scale is divided into millimeters, e.g. on a high quality ruler, a reading could be expressed to 0.2 of a millimeter; e.g. 4.6 mm, 27.42 cm, where 3/5 and 1/5 of a mm are estimated by eye. In cases where the reading falls exactly on a scale division, the estimated figure would be 0; e.g. 48.50 cm, indicating that you know the reading more accurately than 48.5 cm. But it would not be possible to take a reading with greater accuracy then 0.2 mm with this equipment. If the scale is not finely engraved, the lab meter sticks for example, it could probably only be read as 0.5 mm.
The accuracy desired from a measurement dictates the choice of instrument. For example, a distance of 4 m should not be measured by a car's odometer, nor a distance of 2 km with a micrometer. The student learns to decide which instrument is most appropriate for a certain measurement. Ideally, all measurements for any one experiment should have about the same percentage accuracy.
4. Significant Figures
A significant figure is a digit which is reasonably trustworthy. One and only one estimated or doubtful figure can be retained and regarded as significant in any measurement, or in any calculation involving physical measurements. In the examples in (3) above, 4.6 mm has two significant figures, 27.42 cm has four significant figures.
The location of the decimal point has no relation to the number of significant figures. The reading 6.54 cm could be written as 65.4 mm or as 0.0654 m without changing the number of significant figures - three in each case.
The presence of a zero is sometimes troublesome. If it is used merely to indicate the location of the decimal point, it is not called a significant figure, as in 0.0654 m; if it is between two significant digits, as in a temperature reading of 20.5o, it is always significant. A zero digit at the end of a number tends to be ambiguous. In the absence of specific information we cannot tell whether it is there because it is the best estimate or merely to locate the decimal point. In such cases the true situation should be expressed by writing the correct number of significant figures multiplied by the power of 10.
Thus a student measurement of the speed of light, 186,000 mi/s is best written as 1.86 x 10⁵ mi/s to indicate that there are only three significant figures. The latter form is called standard notation, and involves a number between 1 and 10 multiplied by the appropriate power of 10. It is equally important to include the zero at the end of a number if it is significant. If reading a meter-stick, one estimates to a fraction of a millimeter, then a reading of 20.00 cm is written quite correctly. In such a case, valuable information would be thrown away if the reading were recorded as 20 cm. The recorded number should always express the degree of accuracy of the reading.
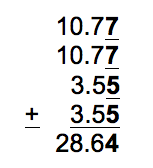
In computations involving measured quantities, carry only those digits which are significant. Consider a rectangle whose sides are measured as 10.77 and 3.55 cm (the doubtful digits are underlined here). When these lengths are added to find the perimeter the last digit in the answer will also be doubtful.
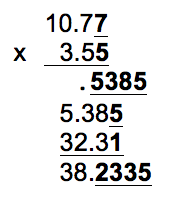
When the lengths are multiplied to obtain the area, any operation by a doubtful digit results in a doubtful digit.


