Main Page/PHYS 4210/Mass Spectrometer
Mass Spectrometer
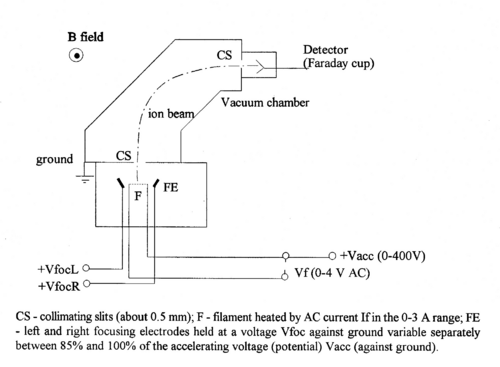
The mass spectrometer is a device that separates and identifies ions according to their mass-to-charge ratio using the linear acceleration and deflection of ions, in electric and magnetic fields respectively.
|
Figure 1 - Schematic diagram of the magnetic selector mass spectrometer.
|
Key Concepts
- Charge-to-mass ratio
- A/D Converter
- Mean free path
- Faraday Cup
- Diffusion pump
- magnetic selector
- Roughing pump
- Ion gauge
- Thermocouple gauge
Pre-Lab Requirement
This experiment has a prelab component. You must complete this exercise before you meet the TA for a demonstration.
Prepare a table of showing at which accelerating voltage you would expect to see a signal for the isotopes listed in Table I below. Provide these for various values of magnetic field between 0.1T and 0.3T.
For example:
| 0.10 T | 0.12 T | 0.14 T | ... | 0.30 T | |
| 1H | |||||
| 4He | |||||
| 6Li | |||||
| 7Li | |||||
| ... | |||||
| 41K |
Theory
A filament coated with a salt (e.g. sodium sulfate) when heated, produces neutral atoms and ions (e.g., Na+). This process of surface ionization works if the ionization potential of the atom is not too large compared to the work function of the metal (cf.. ref. 1).
In turn these ions are accelerated towards collimating slit by a potential difference V, and acquire a (small) kinetic energy of
| (1) |
where q, m, and v are the charge, mass and velocity of the ions respectively.
Some ions pass through the collimating slit and into the homogeneous magnetic field of strength B, this field will deflect them into circular paths of radius R such that the centrifugal and magnetic forces balance. For this condition we have:
| (2) |
Thence from eqs. 1 and 2 the mass-to-charge ratio is given by
| (3) |
The value of R is fixed by the geometry of the spectrometer. In practice there is a problem with determining its accurate value, since the magnetic field has fringes both where the ions enter and exit. Therefore, it is not simply determined by the size of the magnet, but an effective radius has to be determined. By varying B or V, ions with different mass-charge ratios can be collected.
Assuming singly charged ions (q = 1e) and a radius that is fixed by the size of the magnet, we see that knowledge of V and B allows us to identify the mass of a given isotope.
- e = 1.60 x 10⁻¹⁹ Coulombs
- R = 4.8 x 10⁻² meters (you may have to calibrate for a known mass number)
- m = atomic weight in a.m.u., and 1 a.m.u. = 1.66 x 10⁻²⁷ kg.
Note that the magnetic field strength B is measured in Tesla (in MKSA units). (The Earth's magnetic field has a strength on the order of 1 Gauss = 10-4 T). By reading the voltage at the peaks for a particular magnetic field, and substituting into equation (3), it is possible to identify the isotope(s) [use Maple or Mathematica].
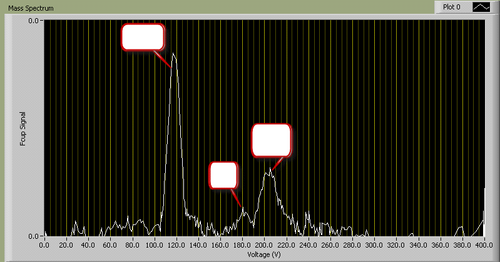
A typical I-V plot for fixed B looks as follows (identity of peaks removed):
|
Figure 2 - A typical mass spectrum.
|
We provide a table with atomic weights for a few atoms that might appear in your spectrum. Consult a table of isotopes that can be found at the back of any Modern Physics text or in the CRC handbook.
| Isotope | Atomic Weight |
| 1H | 1.008 |
| 4He | 4.004 |
| 6Li | 6.017 |
| 7Li | 7.018 |
| 7LiH | 8.026 |
| 9Be | 9.015 |
| 12C | 12.004 |
| 14N | 14.008 |
| 16O | 16.000 |
| 23Na | 22.990 |
| 24Mg | 24.312 |
| 28Si | 28.977 |
| 32S | 31.972 |
| 39K | 38.964 |
| 40Ca | 39.363 |
| 41K | 40.962 |
Table I: Atomic Weights of Isotopes
A problem arises in making the experiment work properly. If the ions were allowed to travel through air, they would collide with air molecules and the simple theory would be inapplicable. Hence the mass spectrometer has to be evacuated via vacuum pumps to increase the mean free path of the ions to be at least as large as the entire distance of travel from the filament to the detector (a simple Faraday cup).
Using kinetic theory it can be estimated from the relationship between the mean free path λ [in mm] and the pressure p [in pascals, 1 Pa = 1 Nm-2 10 μ bar; 1 Torr = 1 mmHg = 133.32 Pa] (ref. 3, eq. 1.16:λ = 6.6/p) that a vacuum better than 10-4 Torr is required to allow the ions to pass 10-15 cm with an insignificant probability of collision.
Two practical problems arise in the context of vacuum technology: (1) how does one generate a high vacuum? and (2) how does one measure a high vacuum? Ref. 3 provides an excellent in-depth overview for both of these problems. We can only summarize here briefly the two-stage approach used for this apparatus:
A rotary forepump is used to provide a rough vacuum (hence the term 'roughing pump') in the range of 50-100 milliTorr, and this vacuum can be measured with a thermocouple gauge (useful down to 1 mTorr). A rotary pump is a more efficient version of a piston pump and is filled with oil to lubricate and seal. The pump chamber drags air molecules from the vacuum chamber to an exhaust outlet.
To achieve a 'high' vacuum (ref. 3, p. 110) an oil diffusion pump is used. An oil chosen for its low boiling temperature is heated and air molecules are dragged along with the vaporized oil. Such a pump has to be backed by a roughing pump. Since one operates the two pumps in series (cf.. Fig. 3), care has to be taken not to create a vacuum in a part of the system that would suck out the oil from one of the two pumps. Thus, careful procedures have to be followed! Also the diffusion pump has to be 'backed' (i.e., the roughing pump must be on) after shutdown until it has properly cooled. If air is allowed to reach the oil of the diffusion pump while it is still hot, the diffusion pump oil will burn and contaminate the high-vacuum system, making extensive clean-up procedures necessary.
A high vacuum can be measured using an ion gauge. A tube with a filament, and separate cathode and anode driven by a controller, is attached to the vacuum system. It detects the presence of a residual gas by measuring the current that is carried between the cold cathode and anode by ions produced from the residual gas striking the hot filament. This gauge is extremely sensitive and varies the filament current to set its range. It cannot be used above 0.1 mTorr (the controller shuts off the filament current). Thus, the ion gauge should not be turned on until the oil diffusion pump has had enough time (at least 20 min.) to warm up and evacuate the chamber to at least this level. Otherwise the lifetime of the $200 tube will be reduced significantly. A vacuum of below 10-5 Torr should be reached after the diffusion pump has typically been in operation for about an hour, provided that the vacuum system was sealed properly.
Very clear step-by-step procedures for the start-up and shut-down procedures for the operation of the vacuum pumps are provided. Follow them carefully. From start-up to measurement and from last measurement to complete shutdown takes about 45 min. respectively.
Familiarize yourself with the vacuum system, the electrical apparatus to drive the mass spectrometer, the magnet assembly and its supplies, the electrometer/XY recorder set-up (that measures currents in the 10-11 A range!). During shut-down you can analyze the spectra.
Procedure
To prepare a filament the holder has to be unscrewed (this should only be done in the presence of a supervisor). Before removing the banana plugs that supply the filament current, accelerating voltage and focusing plate voltages make sure that the power supplies are turned off! Handle the screws carefully! Undo the top screw last and hold the assembly so that it does not bang into the vacuum chamber. Observe how an O-ring is used to ensure a proper vacuum and do not scratch the brass plate or damage the O-ring.
Connect a piece of tungsten wire wound in the form of a coil between the two posts. This is the filament. Paint a weak aqueous solution of Na2SO4 onto the filament (not touching the electrodes or focusing plates). Dry using a blow dryer and reassemble the vacuum system. Make sure the O-ring is seated properly and carefully insert the assembly such that the filament is parallel to the slit. The screws that hold the plate have to be screwed in carefully by hand for the first several turns to avoid damage. Gentle repeated tightening cross-wise ensures a parallel attachment without a torque which is crucial to obtain a good vacuum.
Before you begin the pump down procedure, measure the resistance across the filament from the electrical feedthrough ports to ensure the filament is not borken and is attached correctly
|
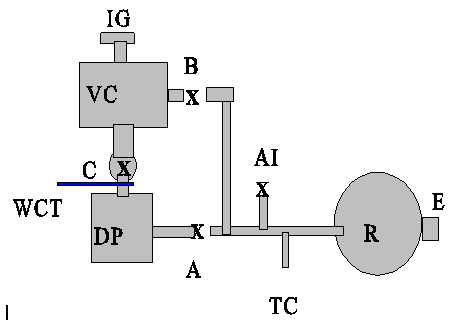
Figure 3 - The Vacuum Pump System.VC - vacuum chamber, DP - diffusion pump, R - rotary or 'rough' pump, IG - ion gauge, TC - thermocouple gauge, X - valves A,B,C, AI - air inlet (valve), WCT - water-cooled trap (liquid nitrogen cooling is possible too), E - exhaust
|
Use the diagram to understand how air molecules flow for the different phases of the start-up and shut-down procedures. Draw arrows that indicate the flow. The procedures are given below.
Start-up Procedure (if diffusion pump cold, and system is at atmospheric pressure)
- Turn on FAN (by connecting the diffusion pump plug to the power bar)
- Turn on WATER (a cooling mechanism above the diffusion pump to trap oil vapour)
- Close VALVES A and B, open VALVE C.
- Close AIR INLET valve
- Turn on ROTARY pump (wall plug) and wait until pressure on TC gauge < 150 mTorr
- Open B-valve to rough out the vacuum chamber; Close B-valve when TC gauge reaches < 150 mTorr again
- Open A-valve to rough the diffusion pump and vacuum chamber (and to back the diffusion pump later)
- When pressure on TC < 150 mTorr, turn on DIFFUSION pump (switch on metal box with indicator light)
- Wait for 30 minutes
- Turn on ION GAUGE controller: a) Power on; b) Filament on
- Turn on filament current, accelerating voltage, (magnetic field supply) when the pressure is below 2x10⁻⁵ Torr.
Shut Down Procedure
- Turn OFF the ION GAUGE: a) Filament off; b) Power off
- Turn of filament current and accelerating voltage.
- Turn off DIFFUSION pump (switch on the metal box), but leave the FAN on
- Wait ONE HOUR for diffusion pump to cool (this can be accelerated by air cooling)
- Close valve A
- Turn ROTARY pump OFF (pull the plug)
- Open AIR INLET valve
- Turn WATER off
- Turn FAN off.
Filament Change/Re-coat Procedure (if diffusion pump is hot, and system is under vacuum)
Preform this procedure if the experiment has been working, and now the filament is either broken or needs to be re-coated with more salt solution. The current state should be diffusion pump and roughing pump ON, VALVE A and VALVE C open, VALVE B closed.
- Turn OFF the ION GAUGE: a) Filament off; b) Power off
- Turn of filament current and accelerating voltage.
- Close VAVLE C. Now the experiment chamber is isolated from the pumping system.
- To bring the experiment chamber to atmospheric pressure,....
- Remove the flange with the filament (watch out when removing the last screw to hold the flange!), and repair/re-coat as necessary.
- Replace the flange with the filament after ensuring the o-ring and sealing surfaces are clean. Tighten all screws.
- Before we can use the diffusion pump on the experiment chamber, we first have to reach a pressure below 150 mtorr. So, our technique will be to stop "backing" the diffusion pump while we "rough out" the experiment chamber.
- Close VALVE A.
- Open VALVE B fully to quickly rough out the experiment chamber.
- One the thermocouple gauge reads below 150 mtorr (hopefully no more than a couple of minutes), close VALVE B and open VALVE A. If you do not reach below 150 mtorr in 5 minutes, close VALVE A and open VALVE B and seek out help.
- Open VALVE C to start pumping on the experiment chamber with the diffusion pump.
- Wait for 30 minutes
- Turn on ION GAUGE controller: a) Power on; b) Filament on
- Turn on filament current, accelerating voltage, (magnetic field supply) when the pressure is below 2x10⁻⁵ Torr.
If you are unclear about any of the above steps, please consult the TA or the Lab Technologist or the Course Director. Any incorrect ordering of opening and closing valves can damage the pumps.
Experimental Procedure
|
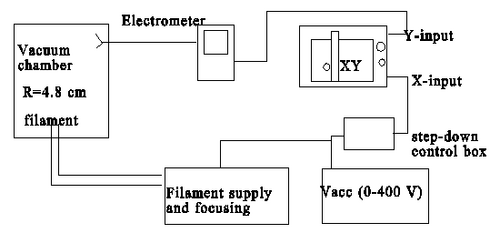
Figure 4 - Electronic System block diagram.
|
|
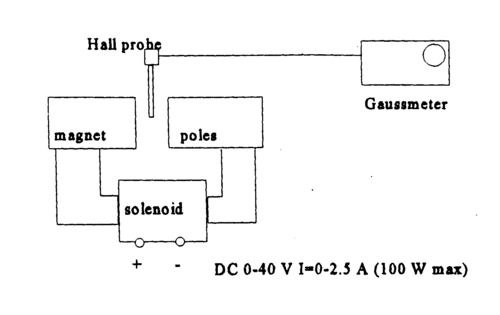
Figure 5 - Electromagnetic, supply and measurement probe assembly.
|
Part A
- Familiarize yourself with the electric circuit shown in Figs. 4 and 5.
- Turn on the magnet power and the gaussmeter. The appropriate range of magnetic field strengths is from 100 to 350 mT. The solenoid current can be tuned by coarse and fine voltage control knobs. Be careful to change the voltages slowly, to not harm the power supply.
- Turn on the AC switch on the accelerating voltage power supply. After a minute turn on the DC. Turn on the recorder, and the picoammeter. The full-scale reading of the electrometer should be in the range of 10 x 10-11 amps. Watch that the needle does not exceed the scale!
- When the vessel has been evacuated to 5x10⁻⁵ Torr or less (ion gauge) and not before, turn the filament supply on (otherwise the filament would burn). Slowly turn the filament setting up to about 2 Volts (30 scalemarks) and watch that the current does not exceed 3 A. If the ammeter does not give a reading, the filament is broken, and must be replaced.
- Ions striking the detector cause a current to pass through the picoammeter. This is amplified, and input to the data collection computer using an LabJack™ Analog-to-Digital (A/D) converter. The accelerating voltage monitored and recorded using another channel of the A/D converter. The accelerating voltage should range from 0 to 400 volts.
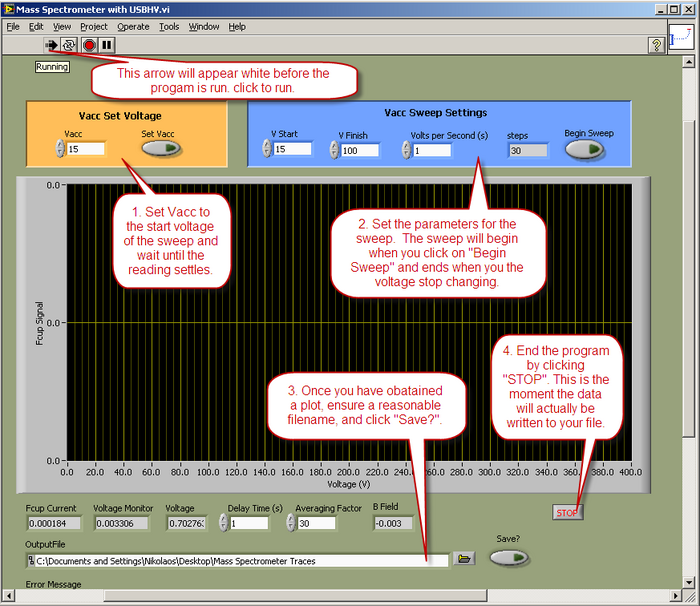
- Data will be collected and displayed using a LabView™ program called “Mass Spectrometer with USBHV.vi”. The operation of the vi is described below.
- Notes on the program:
- The USBHV power supply performance is poor below 15V, so never set a value below that.
- Data is recorded from the time the program runs, until you press "STOP", so in your processing of the data, you need to trim off the unwanted bits.
- A reasonable V/sec setting would be 1 second, but you may decide on other values.
- Data will be recorded from the moment the program start running until the program ends. Before clicking “STOP” ensure the filename is entered correctly and that the “Save?” button is activated.
- If may be necessary optimise the output by using the 'focusing' dials and the 'filament supply' dial while 'sitting' on a peak. Do not exceed a filament current of If = 3A. Data will be collected using a LabJack A/D converter interfaced to a LabView™ control program.
- Attain a mass spectrum for 6 values of applied magnetic field in the range of 0.1T to 0.3T.
|
Figure 6 - LabView™ control program operation.
|
Part B
Now that you have learned how the mass spectrometer works, and have seen Na peak appear roughly where you expect it (hopefully), you can now use the mass spectrometer to determine an "unknown" ion.
Follow the procedure described above in the Filament Change/Re-coat Procedure, coating the filament the unknown salt solution provided. Take scans with an applied B field of 0.16T, 0.2T, and 0.24T. Use your results to determine the unknown salt. Assume a charge of +1.
When finished, follow the shut down procedure.
Required for the Report
- Part A Experimental results. Six graphs (or more) should be recorded for various values of B ranging from 0.1T - 0.3T. Record the current reading on the electrometer for at least one peak on every spectrum.
- Attempt to identify all obtained peaks by calculating q/m values. Draw a graph of V against B2 for the Na+ ions. What can you conclude from this?
- Comment on the variation of the peak current values for the same ionic species for the graphs produced at different B-values. Does the transmissivity of the system vary with V (and B)? Comment on the mass resolution reached at different B-values.
- Part B Experimental results. Three graphs (or more) as detailed above. Identify all peaks. What is the unknown salt? Comment on the expected features of that ions peak.(hint: are there multiple mass isotopes?)
- Provide a drawing of the vacuum chamber and magnet geometry (just where the ions travel) with dimensions (measure roughly with a ruler and estimate slit positions!) and indicate how 90 degree focusing works (ref. 4).
References
- Duckworth, H.E., Mass Spectroscopy, (Cambridge University Press 1958) (pp. 35-36 on Surface Ionization).
- Barnard, G.P., Modern Mass Spectrometry, (IOPP 1953).
- Delchar, T.A., Vacuum Physics and Techniques, (Chapman & Hall, London 1993).
- Marcley R.G., Am. J. Phys. 28, 418 (1960).
- Dewdney, J.W., Am. J. Phys. 28, 452 (1960).
